A Basement Reno Adventure (Man Vs Basement)
Monday, February 15, 2016 How to Finish Your Basement With No Handyman Skill (Man vs Basement)
There’s a few reasons why somebody with no handyman experience and no skill with tools might suddenly decide to finish their basement. It’s a nice way to add value to your home, and for me I wanted to make the space more usable without hiring somebody. Oddly, the largest reason seems to be that I’m attracted to learning new skills and challenges that are way over my head. Through a combination of youtube, real advice, books (Stanley Basements) and heavy amounts of blood,sweat and tears, I managed to get the job done. It really was a ton of work, dominating the mind and body. The excitement and relief of getting finished carried me through the final stretch. Generally, anyone who hasn’t done a basement before, expects you to have finished up in a couple weekends…renoing to many means mostly just painting. Or having a crew of people who actually know what the hell they are doing help you. But people I talked to that had worked on their own basement were familiar with the pain that stretches out over years. I heard a lot about 20 year plans.
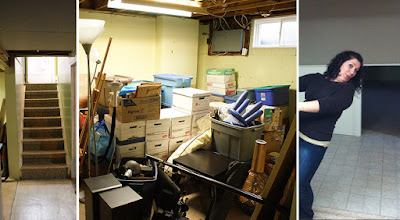 |
| Unfinished playroom in the basement on move-in day. It was painted green, with a wall cut-out for small mammals. |
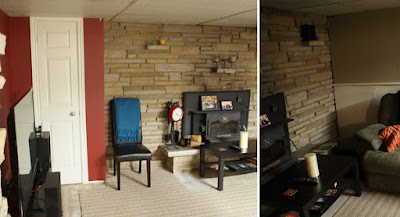 |
| Semi-finished side of basement, mix of random old decor and spotty workmanship |
Before I started, I had no idea it would take me two and a half years of many weekends and holidays to complete, though I did continuously add to the project. Starting smaller would have been better. There were also other house projects taking up time too, and lots of outdoors stuff in the summer. Somethings just don’t go that fast when done by a lone confused person. As a rule, things will take least twice as long as expected. If everything is straightforward plain walls, basement work goes fast, but you can easily get bogged down for several weekends trying to work around or solve something. Figuring out what kind of tool or part you need. Expect to spend hours wandering Home Depot and and also bugging your dad to use his van to get stuff home. One of the biggest frustrations was dealing with older stuff done shoddily by several layers of other people. Starting from scratch is better in almost any scenario.
I wanted to do everything by the book and not cut corners, but on a very tight budget. This meant watching for sales and the pressure of not making many mistakes and wasting material. Overall, not including furniture, I managed to keep the budget under $4000, working on an area of 500-600 sq ft. No fancy high-end finishes here. The basement of the house (standard 1950’s 3-bedroom brick bungalow) was divided into several areas…newer bathroom and bedroom, laundry/furnace/storage, living area circa 1970’s, and a walled off unfinished playroom. Initially after buying the place, I just wanted to remove a wall and finish the playroom. There wasn’t enough space for ping-pong, and the wall had a random cut-out to keep an eye on what I can assume were wild children. I wasn’t even thinking about the living area at this time or bringing things up to modern style.
Wall Demo, Sept 2013
Taking down the wall separating the playroom from the living area went smooth but slowly. I wanted to leave the drop ceiling on the other side up while working in the playroom which meant I had to cut all the studs underneath the top plate, instead of just bashing the whole thing down. Old wood is a pain to cut through. Just one double-sided wall produces a lot of demo material to get rid of too…I hadn’t anticipated the annoyance that getting rid of old stuff is without a big dumpster. There was also some particle board used for various things to take down.
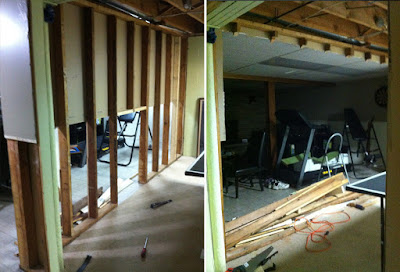 |
| Wall between two areas removed. Top plate temporarily left in place for ceiling. |
Rigid Foam Insulation
After reviewing several different types and methods of starting walls, I decided on rigid foam. Costly, but it gives a little insulation and barrier between the studs and the block wall. It comes in big sheets like drywall. Using construction adhesive I glued them against the wall one by one, doing smaller trimmed pieces afterwards. I leaned my whole body against them to hold them in place for a minute. Joints were taped. It took some time to do the cavities between the joists up above the wall and get those all taped too. Tuck tape tears constantly.
Reroute Duct
Rather than have a bulkhead for a duct right in the entrance way, my uncle suggested to go straight across the room and cross over, under the joist to the register within the wall. I rerouted the duct and a special box shaped duct connected one to the other, once I figured out how to actually get the pieces together.
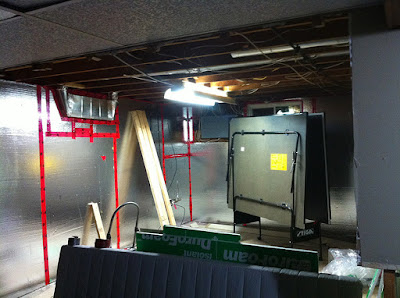 |
| Rigid foam insulation in place, sort of space-age looking. You can see the duct work that will be hidden in wall. |
Framing - Jan 2014
Framing started very slow. I was going minimalist with a hammer, nails and handsaw but this method proved painful compared to a real saw and drill with screws. I got the the top plate in across the joists, then the bottom plate, making sure it was plum with a bob. As the walls, floor and pretty much everything were crooked, they were useless to rely on. The bottom plate was pressure treated wood, fired into concrete with a rammset hammer gun. It was intimidating and smelly firing bullets in the basement, but worked great. You’ll need a second person to stand on the wood so it’s flat in place on the floor. And you’ll have to do it quickly after buying the wood…once it dries it, the pressure treated stuff warps real bad. Studs across the wall followed, with leftover bits as blocking. A four foot level is your best friend to check that everything is straight. I could see how pros can do framing in a day, once you get a rhythm going, but me not so much.
 |
| Framing started, leaving complex items to figure out later |
As far as obstructions, the first wall had a water meter to go around, the second wall had a window and the electric panel, and the third wall along the stairs had some existing framing to adjust and two columns to box. The window wall was complicated because the top plate had joists in the wrong direction to go into, so I had to make some supports to go into. I drew out how to box in the water meter and the electric panel area. For some reason I can’t visualize these things at all, and it took me forever to figure out how to arrange the wood so that it could be secured into these shapes in a tidy manner. I eventually succeeded, magically keeping all boxing level. The boxing in of posts was a lot simpler. I made the choice to leave most of the stair wall framing and add to it, even though there were ins and outs instead of a flush wall. This meant it would be fun to drywall later.
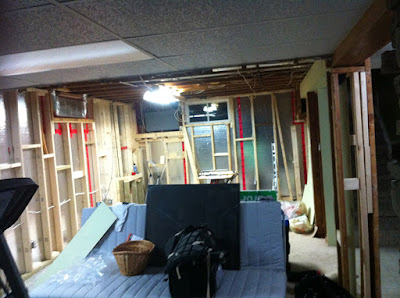 |
| More framing...starting to fill in gaps of more complex areas, and have run electric through studs |
By far the most difficult thing for a newbie is trying to drill in a screw, especially at an angle, while trying to hold wood in place. Some days I got so frustrated. I also had to keep remembering that whenever you expected to have different drywall shapes, it would need wood to secure into at the edges.
Electrical
In this room there was no electric except one random outlet on the panel, and a switch for the light. I put in three outlets along one wall and one on another. I wished I had the giant pro drill bit to blast through wood studs to run wire, but I had to go slowly through each stud. Didn’t really matter what I went with. Small holes made a bit of exercise yanking the wire through and around a corner too. I read up a lot on how to do wire outlets and link them together even though in retrospect it is straight forward. Each wire has a neutral to go onto a neutral and a hot to go on a hot.
I tried to find plastic boxes but couldn’t, so an extra grounding wire was needed in the metal box. This sort of confused me. Getting it all tied together was tough work on the fingertips, and then you kind of have to stuff the outlet back in too. I put some staples down like you’re supposed to to keep the wire all secure. I set the outlets meeting up into a junction in the ceiling, in case I ever wanted to add anything else to it, then I added a new breaker into the panel after shutting the whole thing down, and ran the wire from the junction to it. I wore rubber shoes from paranoia but this was actually simpler than doing outlets. My electrical work is some of the neatest in the house really…nothing of the old stuff is crazy overloaded, but there are some questionables and way too many junctions in the basement ceiling, tapped into for new things, instead of using up a new spot on the panel and running fresh wire. I tried to map all the wires but it was too much of an adventure. It was one of my most exciting and proudest moments when I switched the power back on on and everything worked here.
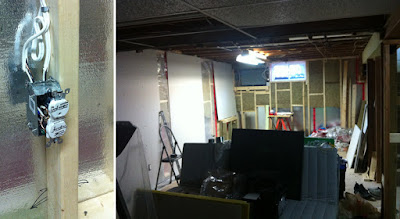 |
| Outlets connected and working. Insulation and barrier in place to start drywall |
Insulation/Vapour Barrier
These were fast steps to do. I stuffed about halfway down the wall, and the upper cavities with Roxul insulation and then sealed everything up with the barrier (one roll was good for the whole project) and Tuck taped the seals.
Drywall - April 2014
My first experience with drywall went about as expected. A van was needed to get the 20 sheets required for the project home, and lugging them down the stairs was surprise heavy exercise. The hanging itself is not complicated, though for one person, the full sheets are a pain to move around. I had a live demo of one sheet for me, so I knew what I was doing. The real time consuming aspect was working with not full sheets, in areas of irregular spaced framing, and all the crazy amounts of boxing especially along the one wall. Trying to cut all these slim long pieces accurately was not fun. I had trouble even with a dimpler getting a nice depth for the screws…sometimes they just don’t go in good and flat. Getting the specific tool for this would have helped, and made things easier for sanding later. Once walls start going up, you do really begin to feel a sense of progress and the actual room itself.
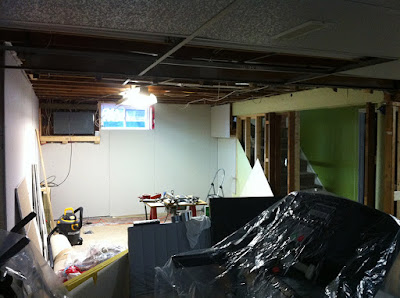 | ||
| First two walls up |
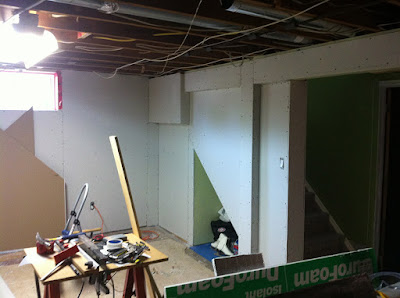 |
| Complex wall with lots of odd shapes and cubby done |
 |
| Wall along stairs up with some shimming to match old wall |
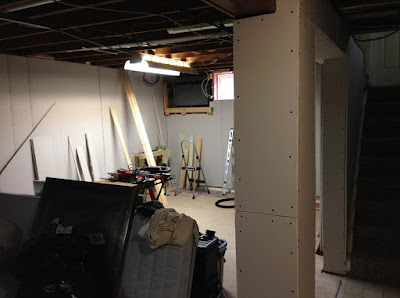 |
| Post box covered. Had to level out the top beam area too before covering |
Project Expansion
It was around this time, I started getting wild ideas in my head, about how great the whole basement could be, with my new found confidence in workmanship. The opposite side of the basement room was dated. A big stone wall, a wood fireplace insert unusable without chimney repairs and liner, old ceiling and walls with visible joints and half trim panel. I decided to redo most of the other room, in a much nicer modern style, with everything new. Kind of sad to to get rid of the wood fireplace but it was the best choice. Since it had been opened up into all one space, it just made more sense and a better overall value, plus I would be happier with it. I did some mockups to get a feel for what I was going for.
Demo 2 - Oct 2014
With the drywall in area one complete I began the demo of the second room space. It was mostly one outer wall I was working on, with the stone wall and one interior wall that would remain in place. I took some extra time here to get things set-up right. The framing was fine (ie sort of straight), even though the wood was really old. Some of the insulation had slipped and some was critter damaged, and there was no interior vapour barrier. Annoying here was that since the bottom half of the walls was decorative board, it had been stepped out like trim, so all the lower parts of studs had shims nailed into them that needed to be removed.
I would have liked rigid foam insulation on the outer wall but it seemed like too much work to take down the whole wall frame…it had been assembled and then put up, so nails hidden would prevent me from removing a stud at a time or even the whole thing without sawing. I did look at the block and seal up any type of small holes or cracks I saw, before resealing the moisture barrier. I decided to reuse some of the pink insulation because I’d already gotten some Roxul and more meant another trip to Home Depot on a super busy Thanksgiving weekend. The R value is a bit outdated on the pink stuff but I didn’t think it would hurt here and there. I re-insulated everything, and then sealed it up with a vapour barrier.
In this stage I also removed all of the old drop ceiling that had been in place for this part of the room. Most of the tiles were gross and yellowed. I saved some of the larger main t’s in hopes of reusing them and preventing waste (which would haunt me later).
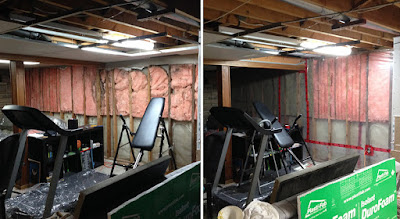 |
| Old shoddy wall and board on opposite side removed. Everything cleaned up, insulated and sealed |
Drywall 2
I put up fresh pieces of drywall along the outer wall which was easy as it was almost all full pieces. I left one section open to work on the electrical outlet.
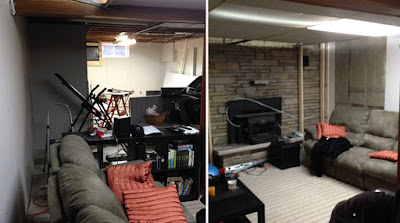 |
| Fresh drywall up along long wall. New framing going up |
Framing 2
I got started on framing over the stone wall. I considered taking it all down which would time-consuming and decided to leave it in place, and serve as a backdrop for two built-in shelves. I had to sledge away a few bricks that were poking out. Working on the cut away shelves was very challenging as it needed some precision. I again had to draw it out to plan how exactly I would be placing the wood. After measuring a bunch of times to make sure it was all symmetric, the wood part fell into place without any hiccups.
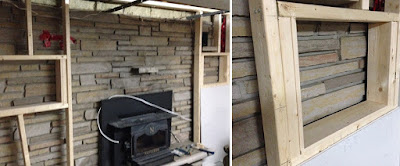 |
| Framing for built in shelf area over top of stonework |
Fireplace Removal
The center of this framing was still open, to allow for the removal of a giant glaring issue. The wood stove insert needed to be removed. Cast-iron weighs a lot. Really a lot. I saw a youtube video which said I could slide it out onto rolled up carpet, which sounded brilliant. I stacked a bit of a wood ramp to step it down from the ledge onto the carpet, which I wrapped in plastic sheet to slide better. The technique actually worked with a helper. It was quite light to push across the room once on the carpet. At about the mid-point of the room where it was parked it did start to slide off. I had to crawl up into the chimney and try to close up the metal damper thing which was broken. Chimney sweep is a career that would have earned my sympathy. This was a huge mess with soot everywhere. It had previously been used with no chimney liner, and was never cleaned back behind there. After I sealed it off with some layers of rigid foam and wood and vapour barrier. The framing was then completed over top of it.
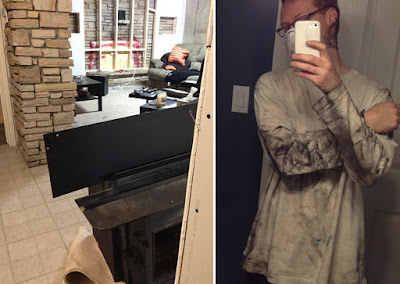 |
| Wood stove fireplace removed. Soot isn't easy to clean up |
Electrical 2
After the framing, I tapped into the one outlet on the outer wall and added another, knowing that the TV would be shifted to that wall and need outlets. I also added another outlet, recessed into the other wall, which the electric fireplace would use and be covered up.
Drywall 3
I finished up the piece of the outer wall, and the centre of the fireplace wall. I messed up a few times around the the built in shelves with my measurements which meant extra muddling later. I also had to add on to the other existing wall, because it wasn’t drywalled up to the top of the room, just the the top of the drop ceiling, which would be raised by a few inches.
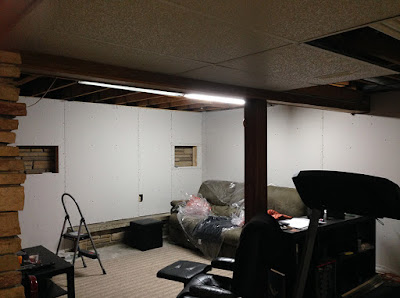 |
| Drywall done, with inset outlet for fireplace to hide the wire |
Fireplace Mounting
Even though somewhat early, I wanted to try out the fireplace, so I went ahead and mounted it to the wall, and it added some sophistication to the layout. I wish it would have been built-in more, but electric fireplaces with heater of the built-in type are actually very costly. Wall mount ones have to be outside of the wall due to the top venting.
Drywall Mudding - Jan 2015
Mudding was as exciting as I anticipated it to be, which is not very. For the whole basement space in my head I thought it would use one big tub of compound…it took four. There were a lot of joints to tape up due to my occasional random drywall patterns. Also did one of the old hallway walls, to try and smooth out some of the bad previous work. After that I did the mudding in 3 stages like I read, using successively larger blades, and scraping the high points between each coat. All of the screws needed mudding too, and I ended up having to put larger globs on the ones that I hadn’t managed to screw in flush. Overall, I thought it was fairly smooth and not too excessive. Doing all the inner and outer corner bead was even less interesting. It did make all the edges look clean, but mudding smoothly over the edges was not easy to do. I used the kind you mud into place with paper edges, not the kind you tack into place.
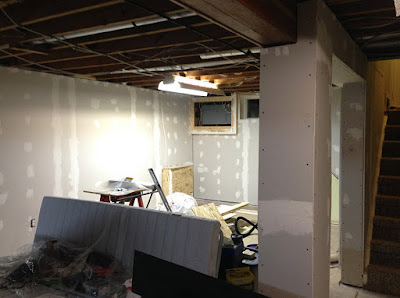 | ||
| Mudding started |
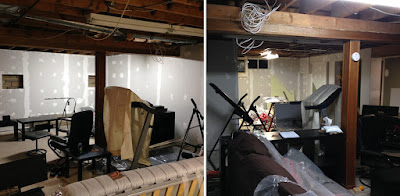 |
| More mudding |
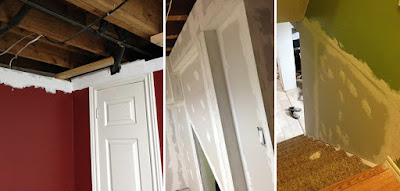 |
| Mudding areas with complex leveling and corner bead mudded in place on inner/outer corners |
Sanding
The worst part of the project by far. Tedious and physically exhausting. I think the experience would be different in a smaller space, but doing a whole basement was was way too many hours of sanding. I did a big chunk of it over three days of a long weekend which was easily 20 hours of sanding just there. Looking back I should have paced myself more. I didn’t say no to some wife help here, since I was worn down so much.
I used a combo of blocks of sandpaper in various grits and also had the shop-vac hooked up to a sander. It cut down on the dust a lot, but was more tiring as the suction against the wall is friction you are working against. I used low-dust compound, which I feel was too dry…needed some water in the mix. The toughest spots were all the edges and nooks and joints…this is where not just doing a flat wall on the one side worked against me. And underneath the walkway area as well…sanding above your head really messes up your arms. I had made extra passes of mud on the other side of stairs to try and bridge a joint gap between old and new, so that took a long time to sand down. I checked everything with a light and it seems like it was smooth.
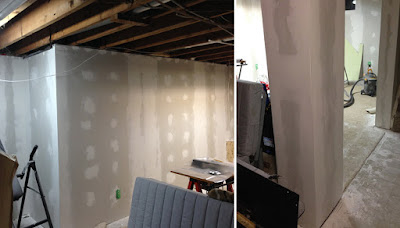 |
| Sanding drywall, a painful process. You can see just some of the dust here |
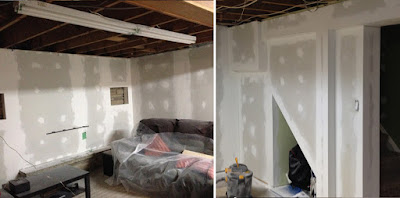 |
| More sanding. Edges and above head are painstaking to do |
Painting & More Sanding
After ruling it sanded and a ton of vacuuming, a coat of paint (light blue paint/primer in one) was rolled onto everything. Basic white primer first would have been a better step to check the sanding job…since redoing primer paint is much cheaper. Because of the strong lighting at this point it was a scary shock. Almost all the mud was still visible…nothing seemed perfectly flat. After calming down I realized that some would need more work, while others once I dimmed/changed out the lighting would be fine. Big chunks of wall and some spots here and there were sanded down more. It is not ideal with actual paint, as it doesn’t sand well. These areas were repainted…some whole walls, some not. This was my first introduction to flashing, whereby the same colour paint leaves a mark if you don’t repaint the whole wall. Up until this point I thought that I could always blend in paint. I did some more larger chunks and settled on what I could live with, versus more expensive painting. I knew with darker lighting the flash spots would reduce too. I actually don’t mind painting, and at this stage things were feeling nice and clean.
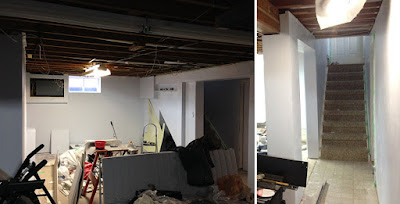 |
| Icy blue coat of paint done, and in some cases redone |
A/V Wiring, TV Mount - Mar 2015
I was both looking forward to and scared of this stage. I wanted to mount the TV and have no visible wires. I read up on some various techniques to do this. Now I could have done it before the drywall, but the TV and its devices/cables were in use, so it would have meant several months without being able to use it. I couldn’t picture any method of having the TV power cord going through the wall for example, without actually having the TV on the wall first, which requires a wall. Plus, I wanted to see the wall to know where to position everything and the TV. I marked it out with tape.
It was going to be a big bundle of cables I needed to fish down the wall. I got some really good cable deals from Prime Cable and got a TV mount that would rotate for different viewing angles. I would be running 4 internal speaker cables, for the 7.1 surround rears, a network cable and cable coax from the ceiling, to be joined by 2 HDMI cables, a digital audio cable and TV power cable adding to the mix coming from the middle of the wall down to the floor. I ran all the ceiling stuff first to the projected opening ( that would be covered by the drop ceiling)…it felt sort of like a spider web.
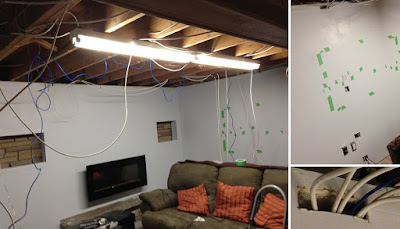 |
| AV wires being set-up and run from top of wall to bottom with coat hanger. TV location marked |
I decided on the magical coat hanger technique to advance the wires, bundling them up one one end of the unfolded hanger with a ball of duct tape. It was one hell of a time poking and yanking all these cables down the wall. I couldn’t quite make it to the middle TV hole and had to cut a smaller one to reach in and advance them. I then added the additional wires, and continued to pull all the way down. My fingers and knuckles were really cut up, but it did all eventually work.
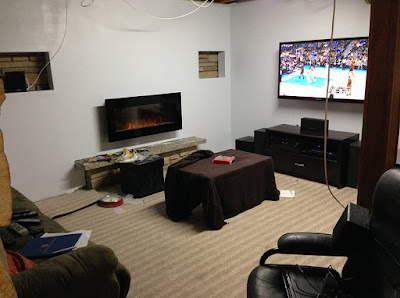 |
| TV mounted on wall and connected |
I put up the TV mount which was more fun…the large bolts didn’t like the really old stud wood…I got some in, and a few most of the way before frying my driver/drill. It smelt awful. I got a hand tool to continue the work, which actually snapped in half and I returned. Since the bolts were in so tight, I just settled for them sticking out a bit. Otherwise getting the TV up on the mount was easy. I connected everything up and enjoyed the viewing experience…the basement started to feel very modern after getting the TV up…the fireplace was put back up too, which made a nice pairing.
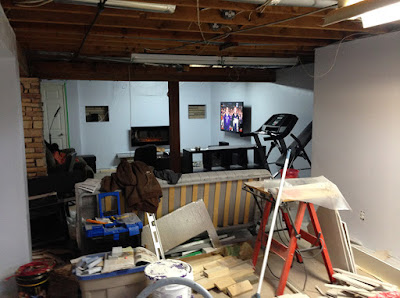 |
| TV view from opposite side of room, and construction debris mess |
Lighting
As mentioned, I needed to switch out the lighting for a few reasons…giant old fluorescent lights were ugly, too bright and would make the ceiling too low anyway. I got a set of light boxes to install, just the most basic builder kind. Removing the existing old lights wasn’t a problem, just a few screws here and there. Putting in three pot lights in the seating area and two in the mid area would dim things down and the rec area would be treated separate. The light boxes drilled right into the joists, and then you just run the wires between them. The wiring just clips in, but it was still painful fingertip work, up in the ceiling in the dark. I’ve seen some people install them on the ceiling grid which would have made finding trim easier, but I didn’t like how unstable it sounded.
For the play area, I took down the really old fluorescent light and used one of the slim newer ones, and switched its direction between the joists instead of across. I wanted this room to be bright enough for ping-pong and other activities, and pot lights can be annoying in that regard. At this time, I also did some work on the joists for the whole space…they had shifted around over the years, so I put in some blocking to try and stop the warping. The old floor upstairs will never be creak free, but I did walk around and mark spots, and put some shims in them, between the joists and upstairs subfloor, to try and fix that.
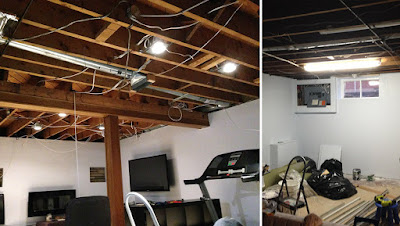 |
| Five recessed lights installed in place of old tubes. Light replaced and moved in rec area |
Support Beam Varnish
The ceiling was being raised by a few inches compared to the previous one, and wood trim wrapping the ceiling beam didn’t go up high enough to be covered anymore. I touched up various spots with paint and varnished the whole part that was uncovered, to try and warm it up and match the warmer wood trim colour. From a distance it matches fine, and just looks like a rough beam.
Stairway Paint
The weird green colour was started to bother me in the stairway landing, so I did a few coats of the same light colour to match it up. Probably should have had a taller ladder here…standing on my toes to reach the top corners, above stairs, did feel dangerous when I was doing it.
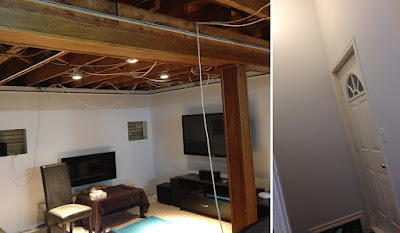 |
| Upper stairway painted, beam varnished and ceiling edge in place around whole room |
Ceiling Edge - May 2015
With all the walls set and painted, I got started on the suspended ceiling. The first step is the edge around the entire space and hallway, that would basically make or break how level the ceiling would be. I measured from the joists down, and also used a chalk snap in combination to try and draw straight level lines around. Knowing from all the wall work that there was slants all over the place, I checked that all the lines were level, and that they were true with each other as best I could. putting the actual metal edge around was slowed down because I couldn’t find anything to drill into it…I had to pre-punch screw holes with a hammer and drywall nail, before putting it up and screwing it in with drywall screws. Corners were tough, and I could have done a better job with fancy cuts there but it seemed liked overkill. I discovered my best friend at this stage, aviation snips. They cut right through metal real nice, and were used for trimming throughout the ceiling process.
Ceiling Grid One
With the edge complete I got started on the ceiling grid for the smaller space ending with the support beam. I saved some of the main T’s from the old ceiling which was great because they were long enough to cover the longest spans. They did need several coats of white paint first though. After roughing out the grid I place everything starting with the mains. I used a string system instead of metal hooks, to allow more flexibility for leveling. The mad part was that the newer cross pieces I had didn’t use the same connection system, which was annoying to find out when already underway. I ended up leaving them lightly connected but not snapped in. It made this area’s ceiling take longer than it should have because the snap-ins are what help you lock in everything as straight. I did get it done with everything feeling straight enough for my liking, and learned my lesson about mixing materials.
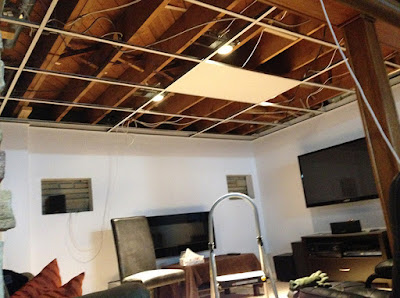 |
| One side of ceiling grid done, ending at beam |
Ceiling Grid Two
The second area’s ceiling rid was much more daunting. The larger space was even just tougher to rough out the grid, getting various obstacles placed where desired, while keeping it even. The biggest thing was the span for the main T’s needed to have two mains connected, and near the end two and a half. With one person it was a wild task to secure them and get them level because 17-18 ft spans flop and sag all over the place, I bungeed each in a few spots, before going along and leveling it all out. Again, I used my twine system here since I felt like metal hooks would take forever, needing to add blocking for the whole ceiling too. I’m sure I’ll need to adjust and replace over time, but I preferred the adaptability. The cross T’s snapped into place cleanly as I went along, helping to keep the whole structure I was building nice and square. When finished I was surprised, considering unevenness of walls etc, how straight the whole thing turned out.
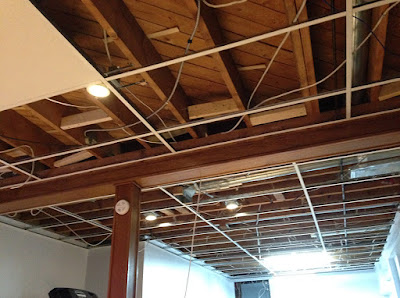 |
| Second half of ceiling grid. More complex due to long main spans |
Movie Shelf
I took a break from the ceiling to add in a movie shelf along the couch wall. I stained and varnished the wood and leveled it out. I wanted to keep it close to the ceiling, to avoid head bumping and also so the rear speakers on it wouldn’t have much wiring showing. I was too tired to pop them through the wall at this stage.
Ceiling Tiles
I used two different types of ceiling tiles for the basement. For the larger space, since they were cheaper ($30 pack), and had more of a flatter, solid finished, I used a type made out of recycled wood stuff that were quite solid. They do look crisp when in place, but are horrible to trim. You need a lot of passes with the knife, and a sharp fresh blade almost every cut, to keep from scraping off the white finish. It just tears right away. For any sort of complicated cut, the patience required doubled. They are difficult to get in place too…very tight fit, with no flexibility equals a lot of wiggling around, getting it up in the ceiling first and then trying to get in in place. I also had a fun time finding recessed light trims (I actually pieced two together to make them tall enough…some of these pieces are crazy expensive at the store for some reason) and covers for the vents that would work out. There were some minor leveling issues too, sometimes I dropped in a bit of wood, to keep the tile down flat.
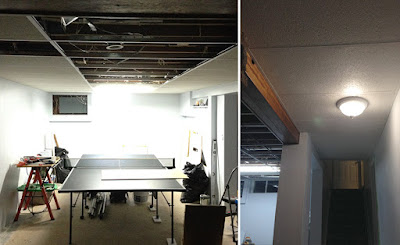 |
| Hallway tiles with light fixture that annoyed me, and slow progress of cut tiles on one side |
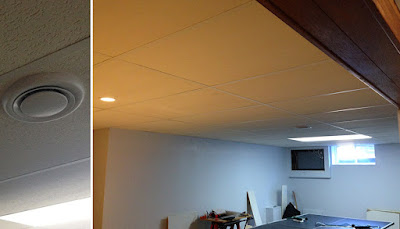 |
| Tiles on one side complete and air fixtures added |
For the other side, due to the grid not being fully secured, I needed to use a lighter fibre glass type tile. Great because the flexibility allows you too bend them into place, and they are easier to cut, but for some reason they cost twice as much, and don’t really look as nice. The lighting was a pain because my trim pieces I put together let light escape, which was showing through the thinner tiles. I had to wrap some solar stuff around it, to lock in the light. Also mounted other surround speakers to upper wall/post at this time. The whole ceiling was the longest phase of the project…I chipped away at it every day over months, and was relieved to get it done, and not have it look half bad. Not as nice as an actual ceiling of course, but in a house this old, I need constant access to electrical and plumbing.
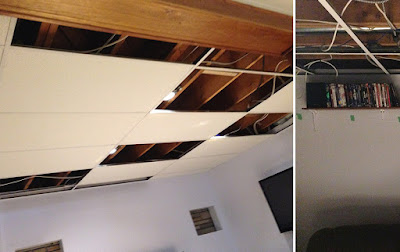 |
| Movie shelf in place, and lighter tiles on other side nearing completion |
I used the lighter tiles in the hallway too. The light fixture that was there had to be disconnected and its wood mount trimmed (since the ceiling was lower). I think I needed about eight hands to connect the wiring back to together, hold the light, the tile and screw it back in.
Floor Removal
The old floor was two different thrown down carpets and carpeted stairs, plus a hallway and some spots of old gross vinyl tiles. The carpet was full of construction debris but was simple to slice and roll and remove. A whole room had a surprising amount of carpet roles to lug up and out. The carpet on the stairs was yanked up to reveal they had been done with laminate from the kitchen. That was a bonus…kind of disappointed they weren’t done with proper noses ( I’m guessing because these cost like $40 each). A nightmare trail of staples were left behind on the stairs though. which meant hours of sitting on the stairs with pliers, squinting and pulling them out. Accepted some wife help on these too because I was going mad.
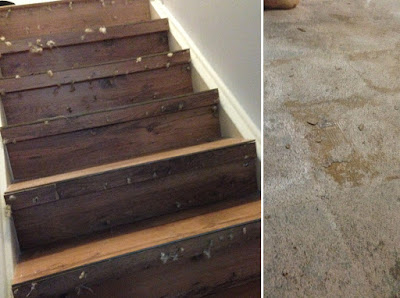 |
| Staples left on stairs and close-up of adhesive on floor |
Since the vinyl tiles were popping up everywhere, I mistakenly assumed they would pop up quick. Some did, but other areas had been glued down with extreme adhesive. It took a long time going at it with a crowbar to get them up. Often they’d crack into tiny bits to chisel away at. The removed tiles were super heavy, because they took up a layer of concrete with them. About halfway through, I thought I should check if they are an asbestos brand…luckily a box was left behind from 1980 and they turned out to be one of the first newer types as that material stopped being used. I scrubbed the whole floor with bleach and water, to get rid of random stuff and muskiness in the concrete. At this stage with no flooring and furniture moved out, the space looked looked huge and empty.
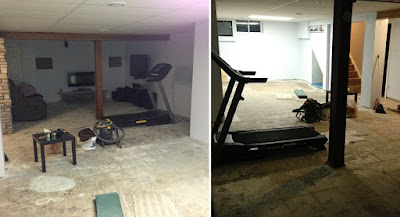 |
| Floor cleared of all tiles and old carpet |
Floor Membrane - Nov 2015
Even though there weren’t any signs of a leaky basement, I wanted to put down a membrane for the floor, for a little extra warmth and moisture barrier, and just in case really. I went with Delta-FL which comes in rolls of dimpled blue plastic, allowing and moisture to drain underneath it. It took me a while to plan out how much I needed and what direction to roll the strips in. I covered the entire floor, and sealed the joints with tape. The edges have the vapour barrier from the wall bottom overlapping and taped. The floor looked very lego-ish. It also makes a clicky-noise that could bother some. Here, I also took off the pipe closet door and trimmed it to have more room underneath for floor height.
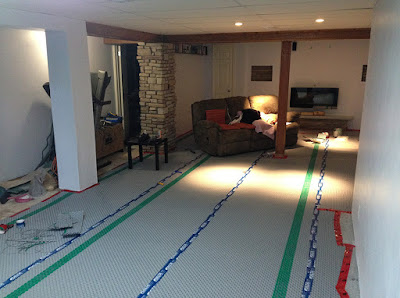 |
| Delta-FL floor membrane rolled down and taped |
Floor Type Choice
I had always planned on doing carpet (and vinyl tile in the hallway) with a heavy underpad for comfort and to handle the unevenness of the floor and stonework. I thought it would be super quick to just have people come in and throw it down in a day and be done. Carpet was more expensive than expected but I came across the dilemma of having used the Delta-FL. It was marketed as lay floor right over top. But way down in fine print, it says carpet requires a plywood subfloor. There was no way I could handle that extra time and cost, and loss of ceiling height which was already tight. There was no way around it either, as the carpeting place said there wasn't a way to put carpet in without tacking, which would puncture the seal. So I could remove the floor membrane and have carpet on just padding, which I didn’t like the sounds of…a cold old basement didn’t feel like a good combo with it. I also thought about using self-leveling stuff on the floor…in theory it sounded great for a small area…but too much potential to make things worse, and keep growing until I needed to do the entire floor, which would be above my pay grade.
So after serious thought, I decided to get a really good laminate floor and just deal with the leveling. It would actually save me money but be more work. Of course, it would look way better for value, and not have to deal with any damp carpet smell ever. I would just lay down rugs where desired. On top of the membrane, I layer down a light layer of underlay, just as an extra softener. The flooring was a great sale…12mm flooring is heavy though…ended up purchasing almost 40 boxes. They helped get it all into two cars at the store, but it was exhausting lugging it all inside down the stairs.
Laminate Flooring
Click flooring is a great invention and is not complicated at all. I started to lay out the floor boards from the near corner. Once I got close to the center of the room in the first few rows ( close to floor drain and support post) it started to get unlevel. It was the worst part in the room…a huge dip, plus the combined meeting of slopes to the drain from three different directions and then high points of the support posts. I started to stuff old vinyl tiles and cardboard underneath to level things, but it was horrible. Successive rows kept getting higher. There was no way I could have enough stuff to throw under there to do the entire basement, which would then basically have a floor built on cardboard an inch up
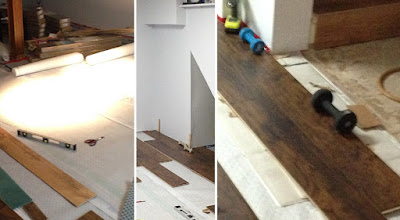 |
| Issues with large dips in the floor and sloping near entranceway |
My toughest choice after a day of this was to give up and restart. The only way I could do the floor was to avoid that part by having a cut-out in the landing. I had planned with vinyl in the hallway close to the drain anyway, but had expected a nice straight line. I knew it would mean some advanced trim work later but hopefully it would work out.
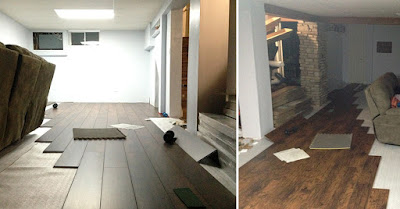 |
| Flooring restarted, avoiding trouble area. Still dealing with slopes throughout |
After restarting laying the floor I made good progress. The gradual slope of the floors could be dealt with..some tough areas in the middle did require some serious bending to click into place. Aside from that slowing down the process I continued on, using a jigsaw to cut end pieces and shapes (should have invested in the mitre saw at this point)and leaving the expansion gap around edges. When needed I did throw some vinyl tiles underneath for leveling. It was mostly an issue along the edge of the hallway still. Long edges were more difficult cuts, ripped with the table saw, which of course I messed up a bunch of times. I over exerted myself working on the flooring. I did the bulk of it with back to back 20 hour weekends, chipping away in between, which was way too much time to be bent over on the floor. I fought through it, because I just wanted it done, but my back paid for it for a month or so. The results were very rewarding though…it looked like a real room, way more high-end than carpet would have looked. I’m still not 100% happy with some of the soft spots…paranoid that it’ll break or unlock, but I’ll have to live with it.
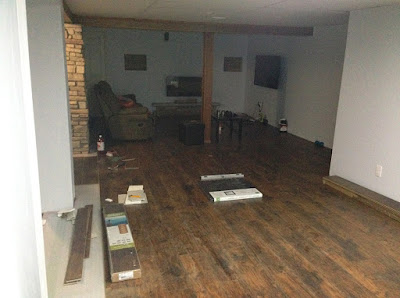 |
| Floor completed for entire main space |
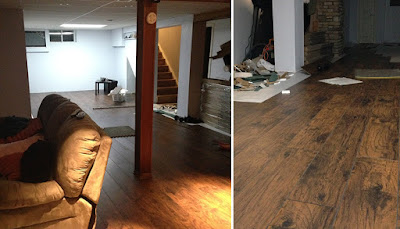 |
| Opposite view of flooring. I thought the look of the floor was working well when completed |
Stair Treads
The stairs were missing noses and were much too slippery, so I had to remedy that. The actual wood pieces would cost a fortune and mean dismantling some of what was there, so I went for the easy solution. They are, after all, just basement stairs. Rubber trim, glued, then nailed in place.
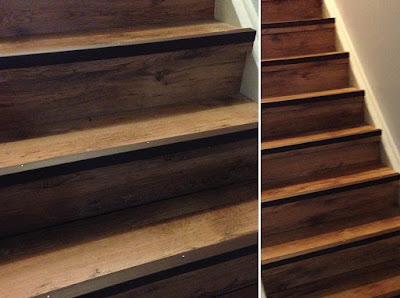 |
| Stairs with all staples gone, and tread noses in place |
Vinyl Plank Flooring
Over the curved areas of the floor, through the hallway, vinyl tiles would be going down. It dealt with the unevenness, and the close proximity to the floor drain, both of which didn’t mix well with laminate. I decided to go with wood-looking planks that matched the colour of the stairs, creating an impression of a landing, or through way. Working in a small area there wasn’t too much trimming or complexity, but the long planks did not want to stick to the curved areas of the floor because of their length. They were more rigid than expected. Even though they had adhesive, about half way through I started using glue to help that problem. It worked better but I’m sure there will still be some spots that pop-up over time to be dealt with..they were applied directly to concrete so I was kind of happy they stuck at all. Some of the bend fought with lining up all the planks right tight against each other but it worked out okay. The floor was all covered at this point.
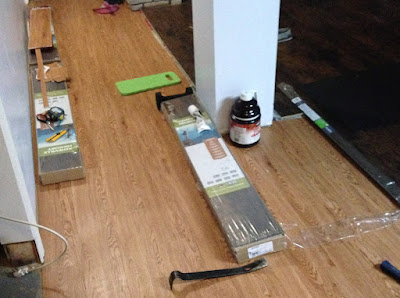 |
| Vinyl plank flooring down through hallway. Matched it up with stair colour. |
Mantle
Needing something over the fireplace I picked up a nice thick piece of barnboard. It was cleaned, sanded, stained and varnished, and mounted with some industrial brackets. I wanted it a bit lower down, but the heat from the fireplace needed more room to circulate and breathe.
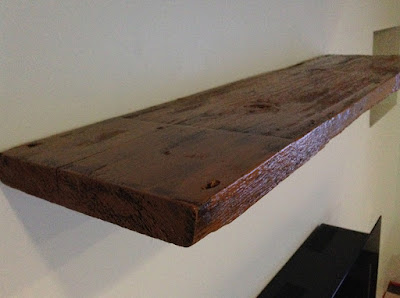 |
| Barnboard mantle. Stained and sealed |
Furniture
I had been searching for a a/v stand for some time and finally grabbed one with a colour I liked on sale. It was very wobbly assembled and I scrapped it and went back to the old dark one. When the area rug came in, I was back to liking the first colour, and reassembled the stand with extra screws. I had them side by side and finally made my choice to go with lighter new one, then put the components in and connected the wires.
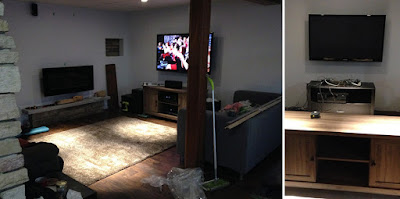 |
| Debating which TV stand to use |
Also got the smallest loveseat I could find and put that together too. Mainly to add some additional seating and to section off the treadmill from the TV area. The room was started to fill up nicely, with everything moved back into it on that side, and the ping-pong table operational on the other side.
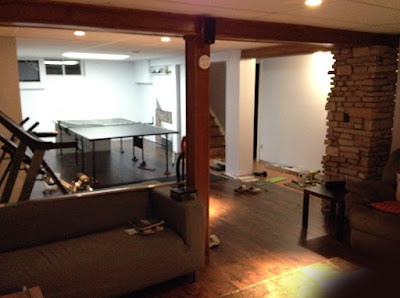 |
| Loveseat assembled, placed to section off sitting area |
Baseboards
I finally gave in and got a mitre saw for the baseboarding, since I knew I would need it for later projects. It was a good choice as I did save a lot of time, compared to attempting it by hand. I like the mitre saw…feels like precise drafting equipment. I managed to fit 20 baseboards into the car somehow and got them home. Took a while to get the hang of the different cuts but eventually I became more precise. I nailed the baseboards in by hand with finishing nails and couldn’t always get them flush…should have just got a nailer and saved hours. Corners can be tough to line up, especially with uneven floors or walls. I don't think I got any of them perfect. When finished I filled all the joints etc, and the nails. I also caulked along the entire top which gave a nice finish. In areas with a big gap between the wall, I used spray foam.
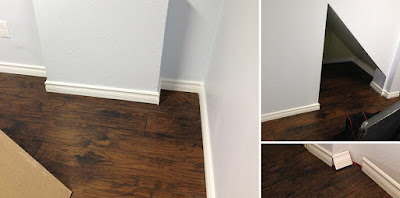 |
| Baseboards going up and touched up. Lots of little areas to deal with |
I also spray foamed the expansion gap along the irregular stone of the fireplace and the other post covering. It took some careful work to sculpt it, and not getting it all over. Afterwards I had to paint match, to get it looking like mortar and blending in. Did some other touch-ups too, like aged wood paint effect on new post quarter round trim.
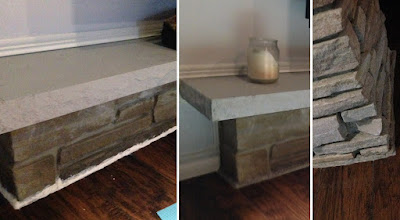 |
| Spray foamed over irregular expansion gap areas. Paint matched to look like mortar |
Transitions
I had to figure out what to do with the 1.5 - 2” drop between vinyl floor and laminate. I found I needed what’s called an overlap reducer, which overlaps the edge but still leaves the expansion gap laminate needs. I got some wood ones (pricey) which still weren’t high enough, so I painted some moulding with a transitional colour, and glued the angled side underneath, creating a taller slope.
 |
| Transitions in place, with trim underneath to get desired height |
 |
| Transition corner gaps filled and colour matched, along with the near side wood (which was a different colour) |
 |
| All kinds of trim and finishing bits and paint matching, using spray foam, filler, caulk, paint and pretty much anything |
Overall I learned from the whole process, tackling skills in many different areas, so that the next project I can improve. Still some things to do like more decor choices and things like cabinet doors, stair rail etc..I'll probably take a few staged photos when it's set. For now I'm ready to relax a bit and enjoy the man-cave before it's on to the next challenge.


0 comments